

How to Apply Press-On Nails So They Last Longer: Prep, Sizing, Glue and Removal
Application guide · 8 min read
Press-on nails last longest when your natural nail is clean, dry and oil-free, each tip is sized to your nail bed, and a thin, even layer of glue is pressed down for 30 to 45 seconds. Most sets then wear for several days, and up to about two weeks with good prep and care. The application matters more than the glue.
The short version
- Prep beats glue. Oil, moisturiser and cuticle cream stop adhesive from bonding.
- Size every nail. A tip that is even 1 mm too wide will lift at the side wall.
- Use less glue than you think. A grain-of-rice amount is enough for one nail.
- Press and hold. Thirty to forty-five seconds of firm pressure prevents air pockets.
- Remove with remover, not force. Prying is what damages nails and ruins reusable sets.
Why press-on nails lift early
When a press-on pops off after a day, the adhesive usually is not the problem. The bond failed at the natural nail because something was sitting between the two surfaces, or because the tip never made full contact in the first place.
The four most common causes we see are:
- Oil or moisture on the nail plate. Lotion, cuticle oil, soap residue and even a recent shower leave a film that glue cannot grip.
- Wrong size. A tip that is too small leaves the side walls exposed. A tip that is too large rocks on the nail bed and creates a gap at the cuticle.
- Too much glue. A thick blob cures unevenly and overflows onto the skin, where it peels away and takes the seal with it.
- Not enough pressure or time. Semi-solid glue needs firm, steady pressure to spread and grab. Five seconds is not enough.
Fix those four things and most sets will feel noticeably more secure, even before you change products.
What you need before you start
You do not need a salon setup. A clean towel, good light and a few small tools are enough.
- A 180-grit nail file and a soft buffer
- A wooden or silicone cuticle stick
- 70% isopropyl alcohol and a lint-free pad, or an alcohol wipe
- Your press-on set and the size chart that came with it
- Semi-solid nail glue or adhesive tabs, depending on how long you want to wear them
- Optional: a cuticle oil for after application, not before

The adhesive we use
Semi-Solid Nail Glue + Remover Kit
A thick, no-lamp gel glue that stays where you place it, plus a gentle remover that lets you lift the tip intact and wear the set again. No UV lamp, no soaking and no prying.
Shop the kit - $16.99How to apply press-on nails: 8 steps
Set aside 15 to 20 minutes for your first full set. Once you know the routine, most people finish in about 10 minutes.
1. Start with bare, dry nails
Remove old polish and wash your hands with soap and water. Dry thoroughly, including the sides of each nail and the cuticle fold. Do not apply hand cream before you start.
2. Push back the cuticles, do not cut them
Use a cuticle stick to gently push the cuticle back. You want a clean margin at the base of the nail, but you do not need to remove living tissue. Cutting the cuticle can leave the nail edge irritated and more prone to lifting.
3. Buff the shine off, then remove the dust
Lightly buff the surface of each natural nail with a soft buffer. You are not trying to thin the nail, just to remove the glossy layer so the glue has something to grip. Wipe away every bit of dust with a dry lint-free pad.
4. Dehydrate with alcohol and let it dry
Wipe each nail with 70% isopropyl alcohol. This removes the last of the oil and dust. Wait 30 seconds for the nail to dry completely before you open the glue. This is the single most skipped step, and it is the one that makes the biggest difference.
5. Size all ten nails before you glue anything
Lay out the full set and match every tip to its finger. Check the width at the widest part of your nail bed and the curve at the cuticle. If a tip needs to be slightly narrower, file the side walls a little at a time. Do not glue the first nail until all ten are matched.
6. Apply a thin line or small dot of glue
For semi-solid glue, a dot about the size of a grain of rice is enough for one nail. Apply it to the underside of the press-on tip, near the cuticle edge, or to the natural nail if your product instructions say so. Avoid the skin and keep the glue away from the cuticle line.
7. Place at a 45-degree angle and press for 30 to 45 seconds
Line the tip up with the cuticle, lower it at a 45-degree angle, then press down firmly and evenly. Hold for at least 30 seconds, and 45 seconds for a long or curved set. Release slowly and check that the side walls are sealed. If the tip rocks, remove it, clean off the glue and start again with less adhesive.
8. File the free edge if needed and wait one hour before water
If a tip feels too long, file the free edge in one direction rather than sawing back and forth. Avoid hot water, washing dishes, swimming and heavy cleaning for the first hour while the bond settles.
Quick check: run a fingernail along the side of each press-on. If you can catch the edge, the seal is not complete. Press that side again or re-seat the tip before moving on.
How to choose the right press-on nail size
Size is measured across the widest part of the natural nail bed, not the length of the nail. Use a soft measuring tape or a strip of paper: mark the left and right edges, then measure the distance in millimetres.
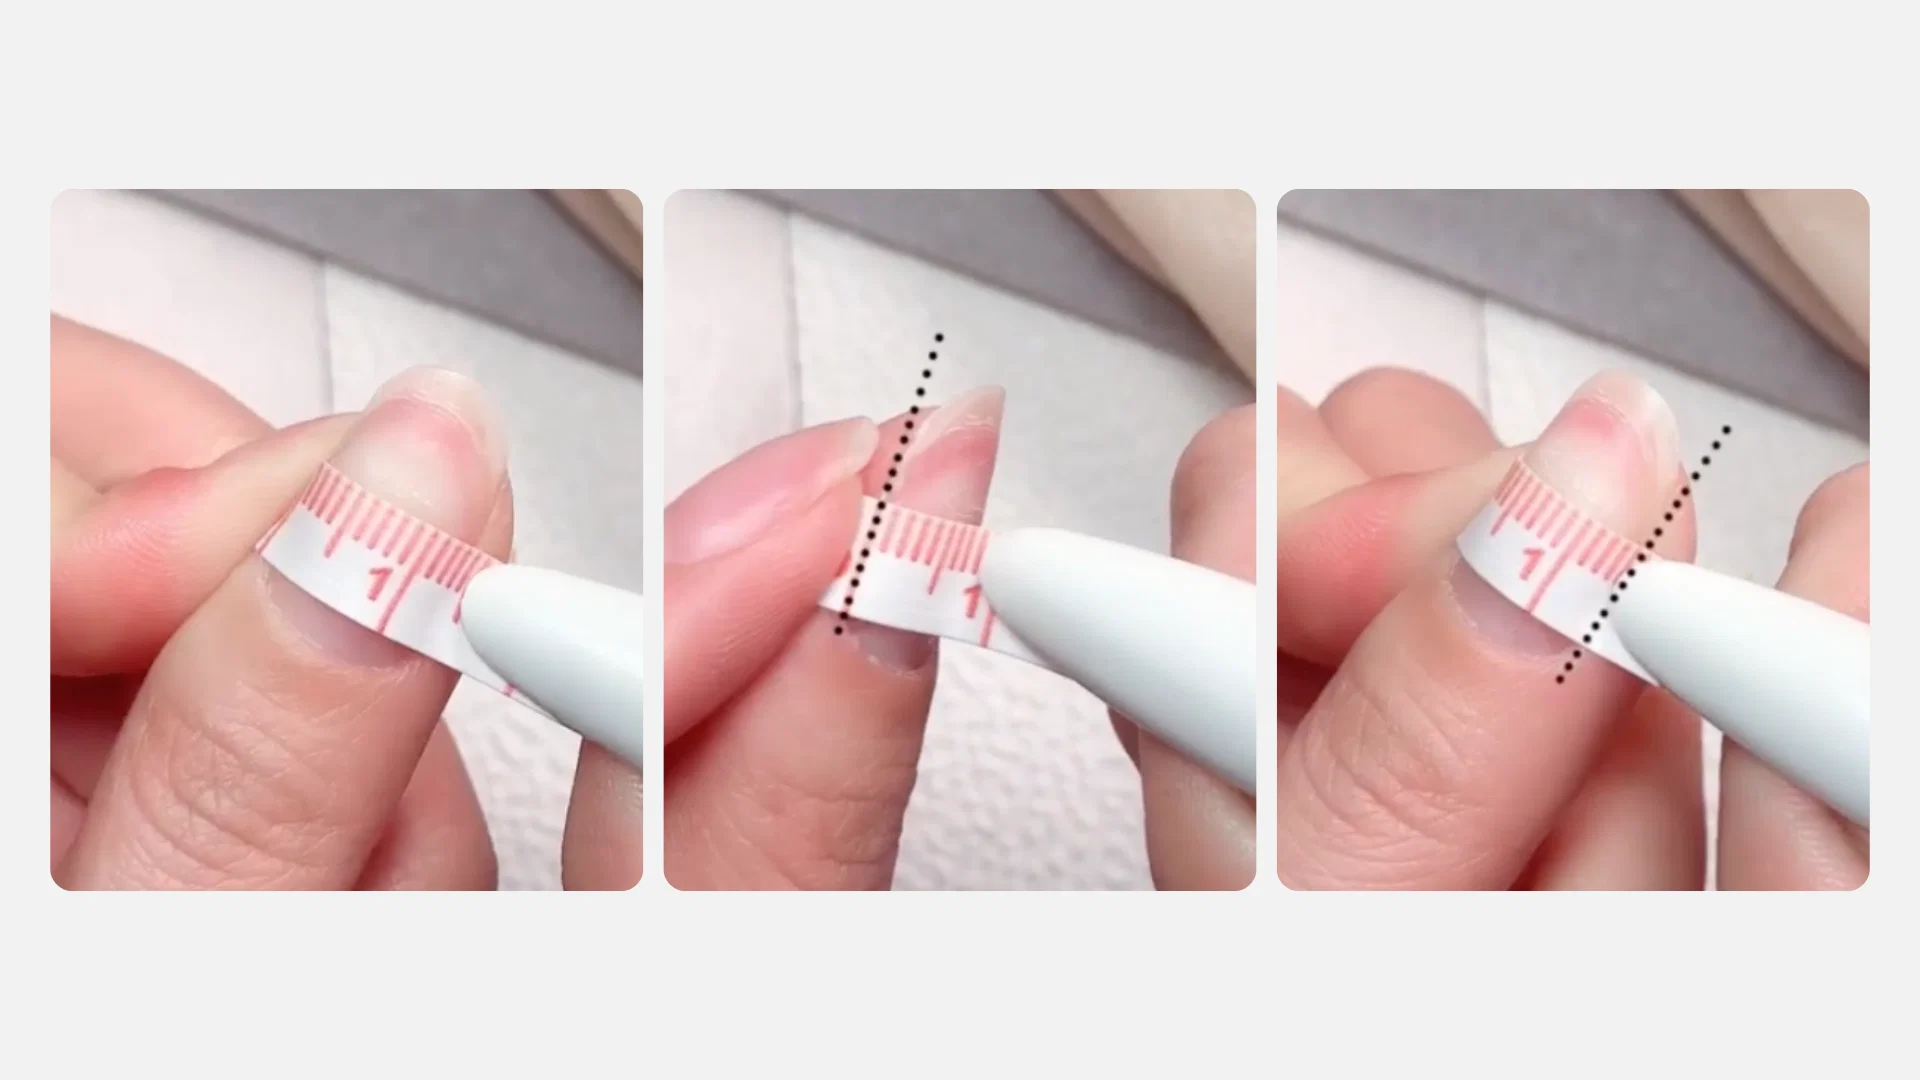
Write down all ten measurements before you choose a set. Most people are not the same size on every finger, and your dominant hand is often slightly wider.
| Set size | Thumb | Index | Middle | Ring | Pinky |
|---|---|---|---|---|---|
| XS | 14 mm | 10 mm | 11 mm | 10 mm | 8 mm |
| S | 15 mm | 11 mm | 12 mm | 11 mm | 9 mm |
| M | 16 mm | 12 mm | 13 mm | 12 mm | 10 mm |
| L | 17 mm | 13 mm | 14 mm | 13 mm | 11 mm |

Still unsure? Our Press-On Nail Size Finder walks through the paper-and-ruler method with photos, and our team can check a photo of your measurements before you order.
Glue vs adhesive tabs: which should you use?
Both work. The right choice depends on how long you want to wear the set and how often you change your nails.
| Method | Typical wear | Best for | Removal | Reusable? |
|---|---|---|---|---|
| Semi-solid glue | A few days to about 2 weeks | Everyday wear, holidays, long sets | Glue remover, then lift with a stick | Yes |
| Adhesive tabs | A few hours to 2 days | Events, photos, trying a new shape | Peel gently from the side | Yes |
| Brush-on liquid glue | About 1 week | Quick repairs and short wear | Soak or remover | Sometimes |
| UV gel glue | 2 to 3 weeks | Salon-strength wear | Soak-off, usually with a lamp | Difficult |
If you change your nails every few days, tabs are faster and gentler. If you want a set to survive a working week, a semi-solid glue gives you a stronger seal without a lamp. Our Nail Glue & Tools collection has both the adhesive and the remover in one place.
5 mistakes that make press-ons pop off
- Using hand cream right before application. Oil is the enemy of adhesion. Save the lotion for after the set is on.
- Putting glue on the cuticle. Glue that touches skin bonds to skin, not to the nail, and peels up as the skin moves.
- Using too much glue. A thick layer traps air and takes longer to set. Less is more, especially on curved nails.
- Pressing for only a few seconds. Give each nail 30 to 45 seconds of firm, still pressure. Do not test the tip by wiggling it.
- Using your nails as tools. Opening cans, scraping labels and typing hard are the fastest way to lift a side wall.
How to remove press-on nails without damage
A set that is removed gently can be worn again. A set that is pried off usually cannot.
- Apply glue remover around the seam where the press-on meets the natural nail. Work along the sides and the cuticle edge.
- Wait one to two minutes for the adhesive to soften. Do not rush this step.
- Slide a wooden cuticle stick under the edge and lift with steady, gentle pressure. If the nail does not move, add more remover and wait again.
- Once the tip lifts away, wipe the underside with a lint-free pad and remove any remaining adhesive with the stick.
- Wash your hands, dry them, and apply cuticle oil around the nail, not under the press-on before storage.

For easy removal
Nail Glue Off Remover
Apply along the edge, wait about a minute, then lift with a cuticle stick. The acetone-free formula is designed to soften the bond without soaking or filing.
Shop remover - $8.99How to clean and reuse your press-on nails
Reusable sets need a little care between wears. The goal is to remove old adhesive without scratching the painted surface or bending the tip.
- Peel or scrape off the old glue with a wooden stick. A little remover helps loosen it.
- Wipe the inside with a dry lint-free pad. Avoid acetone on painted art, charms or rhinestones.
- Lay the tips out in the original box, adhesive side up, so they do not stick to each other.
- Store them away from direct heat and sunlight. Heat can soften the tips and change the curve.
How long do press-on nails last?
Wear time depends on the adhesive, your nail prep, how much water your hands meet and how you use your nails. These are typical ranges, not guarantees:
- Adhesive tabs: a few hours to about two days.
- Brush-on glue: around one week.
- Semi-solid glue: several days, up to about two weeks with good prep.
- UV gel glue: two to three weeks, with a soak-off removal.
Hot water, washing dishes without gloves, hand cream and cuticle oil all shorten wear. So does nail growth: as the natural nail grows, the cuticle gap opens and the tip starts to lift from the base.
Everyday habits that extend wear
- Wear gloves for dishes, cleaning and gardening.
- Apply cuticle oil around the nail, not under the press-on.
- Use the pad of your finger, not the tip, to open packaging and press buttons.
- Carry a small glue tube for repairs. Re-glue a lifting edge as soon as you notice it.
- Do not test the bond by wiggling or pulling the tip. If it feels loose, remove it and re-seat it properly.
Shop the routine
Start with a set that matches your everyday style, then add the adhesive and remover so you can wear it again.
 Punk Graffiti Art Nails | Short Square Bold Statement Set
$29.99
Shop this set
 Matcha Garden Nails | Long Almond 3D Floral Set
$39.99
Shop this set
 Vintage Glam 3D Floral Nails | Long Coffin Luxury Set
$45.99
Shop this set
Prefer a shorter length for everyday wear? Browse short press-on nails. Want a softer shape? Shop almond press-on nails. You can also see every design in the full collection.
Frequently asked questions
Do press-on nails damage your natural nails?
Not when they are applied and removed correctly. The risk comes from prying a tip off, filing the nail too hard or using a harsh soak repeatedly. Use a remover, wait for the bond to soften and lift with a stick instead of pulling.
How long should I press each nail?
Hold firm, even pressure for 30 to 45 seconds. Long or curved tips need the longer end of that range. Do not release early to check the fit, because that can break the seal before the adhesive has grabbed.
Can I shower with press-on nails?
Yes, once the adhesive has fully settled. Wait about an hour after application before hot water, then wear gloves for long, steamy showers or washing dishes. Prolonged hot water softens many adhesives and shortens wear.
Do I need a UV lamp for press-on nails?
Only if you are using a UV-cured gel adhesive. Semi-solid glue and adhesive tabs do not need a lamp. Our semi-solid kit is designed to set with air and pressure, so you can apply a full set without any curing equipment.
Can I reuse press-on nails after wearing them?
Yes, if you remove them gently. Clean the old adhesive from the inside, store the tips in their box and re-glue them with a fresh dot of semi-solid glue. Painted art and 3D charms can last through several wears when you avoid acetone and harsh scraping.
What should I do if a nail pops off?
Clean the natural nail and the inside of the tip, remove any old adhesive, then re-apply with a small amount of glue and press for 30 to 45 seconds. If the tip is cracked or the side wall is bent, replace it rather than forcing it back on.
Before your next set
Good press-on nails are not just a design choice; they are a fit and prep decision. Measure all ten nails, keep the natural nail dry and oil-free, use a thin layer of adhesive and give each tip enough time to set. That routine is what turns a one-day set into a week of wear.
If you are ordering for the first time, start with our Size Finder and read the Shipping Policy for current delivery times. Need a different shape or length? The full press-on collection has short, medium and long sets in almond, square, coffin and stiletto shapes.